Uploading and Saving Documents
Uploading and Saving Documents
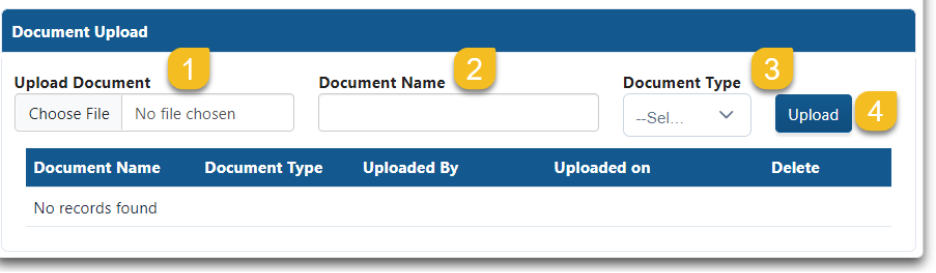
Steps to Upload a Document
- Select “Choose File” and locate the completed document from your computer.
- Name the document.
- Select what type of file you are uploading, Eligibility or IEP.
- Select “Upload.”
- Completed eligibility, IEP, revocation, and/or Services Plan require the finalized document to be uploaded.
- The document upload section will appear at the bottom of the Delay Response section.
- Document upload will only appear after entering a Completion Date for either the Eligibility or IEP.
- After submitting the completed file, the student’s name will appear on the main page at the bottom with a check indicating it has been completed.
- No additional edits can be made to the student’s file.
If a reevaluation was requested for IEP purposes, upload the IEP showing the updated evaluation results reflecting the completion of the reevaluation process.
- For document type, select eligibility.
Saving
When the LEA has successfully saved a file, a message will appear at the top of the application confirming the uploads were saved. To return to the main page, Select “Back to Overdue Eligibility and IEP Student List.”

Confirmation
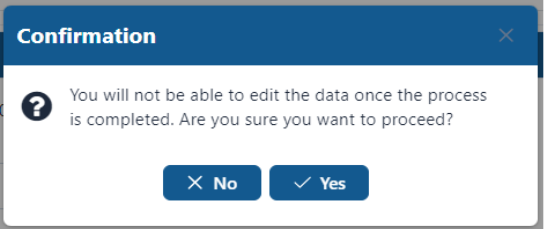
When “Complete Process” has been selected, a popup box will appear stating that the file will not be editable once the process is complete. It will ask if you want to proceed.
If you Select “No,” you will return to the current file.
If you Select “Yes,” you will see the “Process Completed successfully” message.
To return to the main page, Select “Back to Overdue Eligibility and IEP Student List.”
Warning Messages
Warning messages will appear to improve the accuracy of the data collected.

Warning examples include:
- Enter a future date for completed eligibility. Future dates may not be entered.
- Entering the completed eligibility date without the expected completion date.
- Not entering the outcome of the eligibility determination.
- Not entering the eligibility categories for which the student is eligible.
- Completed eligibility or IEP was not uploaded
- Entering information in overdue eligibility or IEP sections and then switching to withdrawn.
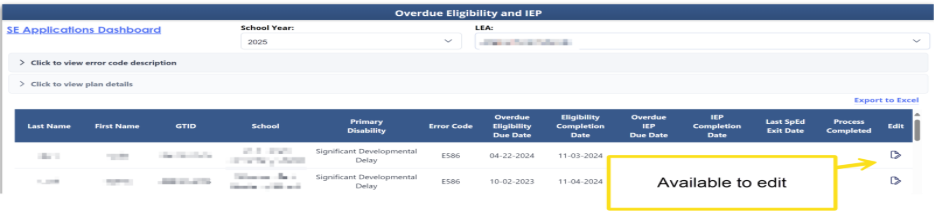
Incomplete Files
Students who are not yet completed are available to edit. They will appear on the student list with the icon of a pencil and paper. Files without a check mark must be completed prior to the final submission. The application will not allow the LEA to submit the application without all the files being complete.
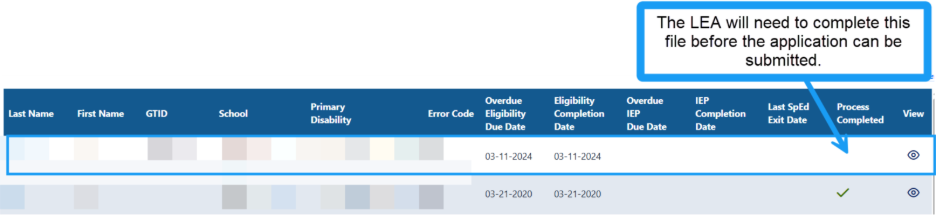
Completed Files
Completed students will appear at the bottom of the student list in alphabetical order. The green check indicates that the file is complete. The eye icon allows users to view the completed file, which is not editable.

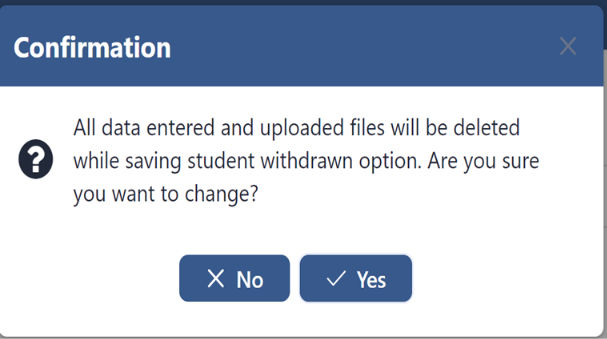
If you enter information into the overdue eligibility or IEP section and then switch to the withdrawn radio button, you will receive this confirmation.
If you select Yes, you will lose any data entered.
Export to Excel
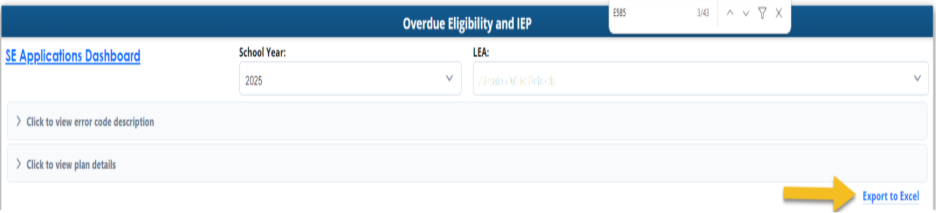
Once the user has completed the reason for the delay, an Export to Excel is available. The export list allows the LEA to sort the file to determine the most frequent type of delays experienced by the LEA. This will help the LEA draft an improvement plan.
- Primary Disability
- Error Code Type
- Overdue Eligibility Due Date
- Eligibility Completion Date
- IEP Completion on Date
- Process Completed